How to keep a lab notebook
What is a lab notebook?
A lab notebook is a record of the work done in the lab. The expectations and requirements for lab notebooks vary between research or industry lab, as well as different researchers within a given lab. However, some there are some general guidelines that all lab notebooks follow:
Clear, concise, and comprehensive notes on experiments done in the lab – notes should be clear enough for someone else who is looking back at the notes to follow the same steps you did, as well as any mistakes that were made. Notes should also not be too long or lengthy that they are not easy to follow. Notes must be legible, clear, and organized. Especially when you are doing collaborative experiments or working with a mentor, others will certainly need to refer to your notes and may need to continue or pick up experiments where you left off.
Verification of legitimacy: In some extreme cases, lab notebooks have been used as legal documentation of experiments and discoveries made in the lab (the recent patent dispute about CRISPR-Cas technology is a great example of how lab notebooks were used to settle a billion dollar patent dispute). Thus, lab notebooks should be taken extremely seriously. They, as well as the work they document, are property of the lab and the institution in which you are working. To affirm the legitimacy, truth, and comprehensiveness of your lab notebook, entries should be signed and dated daily.
Safe storage: All researchers that work with me need to back up their lab notebook in the cloud.
What is the importance of a lab notebook?
In most labs, the lab notebook serves as a record for others in the lab to keep track of what work you’re completing and refer back to your specific protocols in case others need to replicate them later. Therefore, it is extremely important that you take care to keep organized and comprehensive notes on your work so I (and any others) can use them without having to contact you, perhaps even after you’ve left the lab.
Parts of a lab notebook entry:
Name, date, title: At the beginning of each lab notebook entry, you should include your name, the date, and a brief title for the experiment.
Some iteration of the experiment: I organize my projects with a labeling system that starts with the lab notebook and is consistent across my data, analysis, and presentations. I organize projects into notebooks (NXX), then projects (NXX-PXX), then specific experiments (NXX-PXX-EXX).
For example, each large research project that I’m working on will have multiple sub-projects in it, and different experiments for each sub-project. If I wanted to build a house, building the house might be the main project (N01), but it has several sub-projects, such as drawing up a blueprint (N01-P01), finding a contractor (N01-P02), etc. To complete each sub-project, such as drawing up a blueprint, I’d have smaller, daily tasks. For example, contacting potential architects (N01-P01-E01).
Research projects work in a similar way. For example, in a large experiment where I was sequencing the RNA of different nectar yeasts (N01), I had different projects (N01-P01, N01-P02) and within each projects, different experiments (N01-P01-E01). I also had experiments that were completed over several days, so each date had a separate entry that is dated.
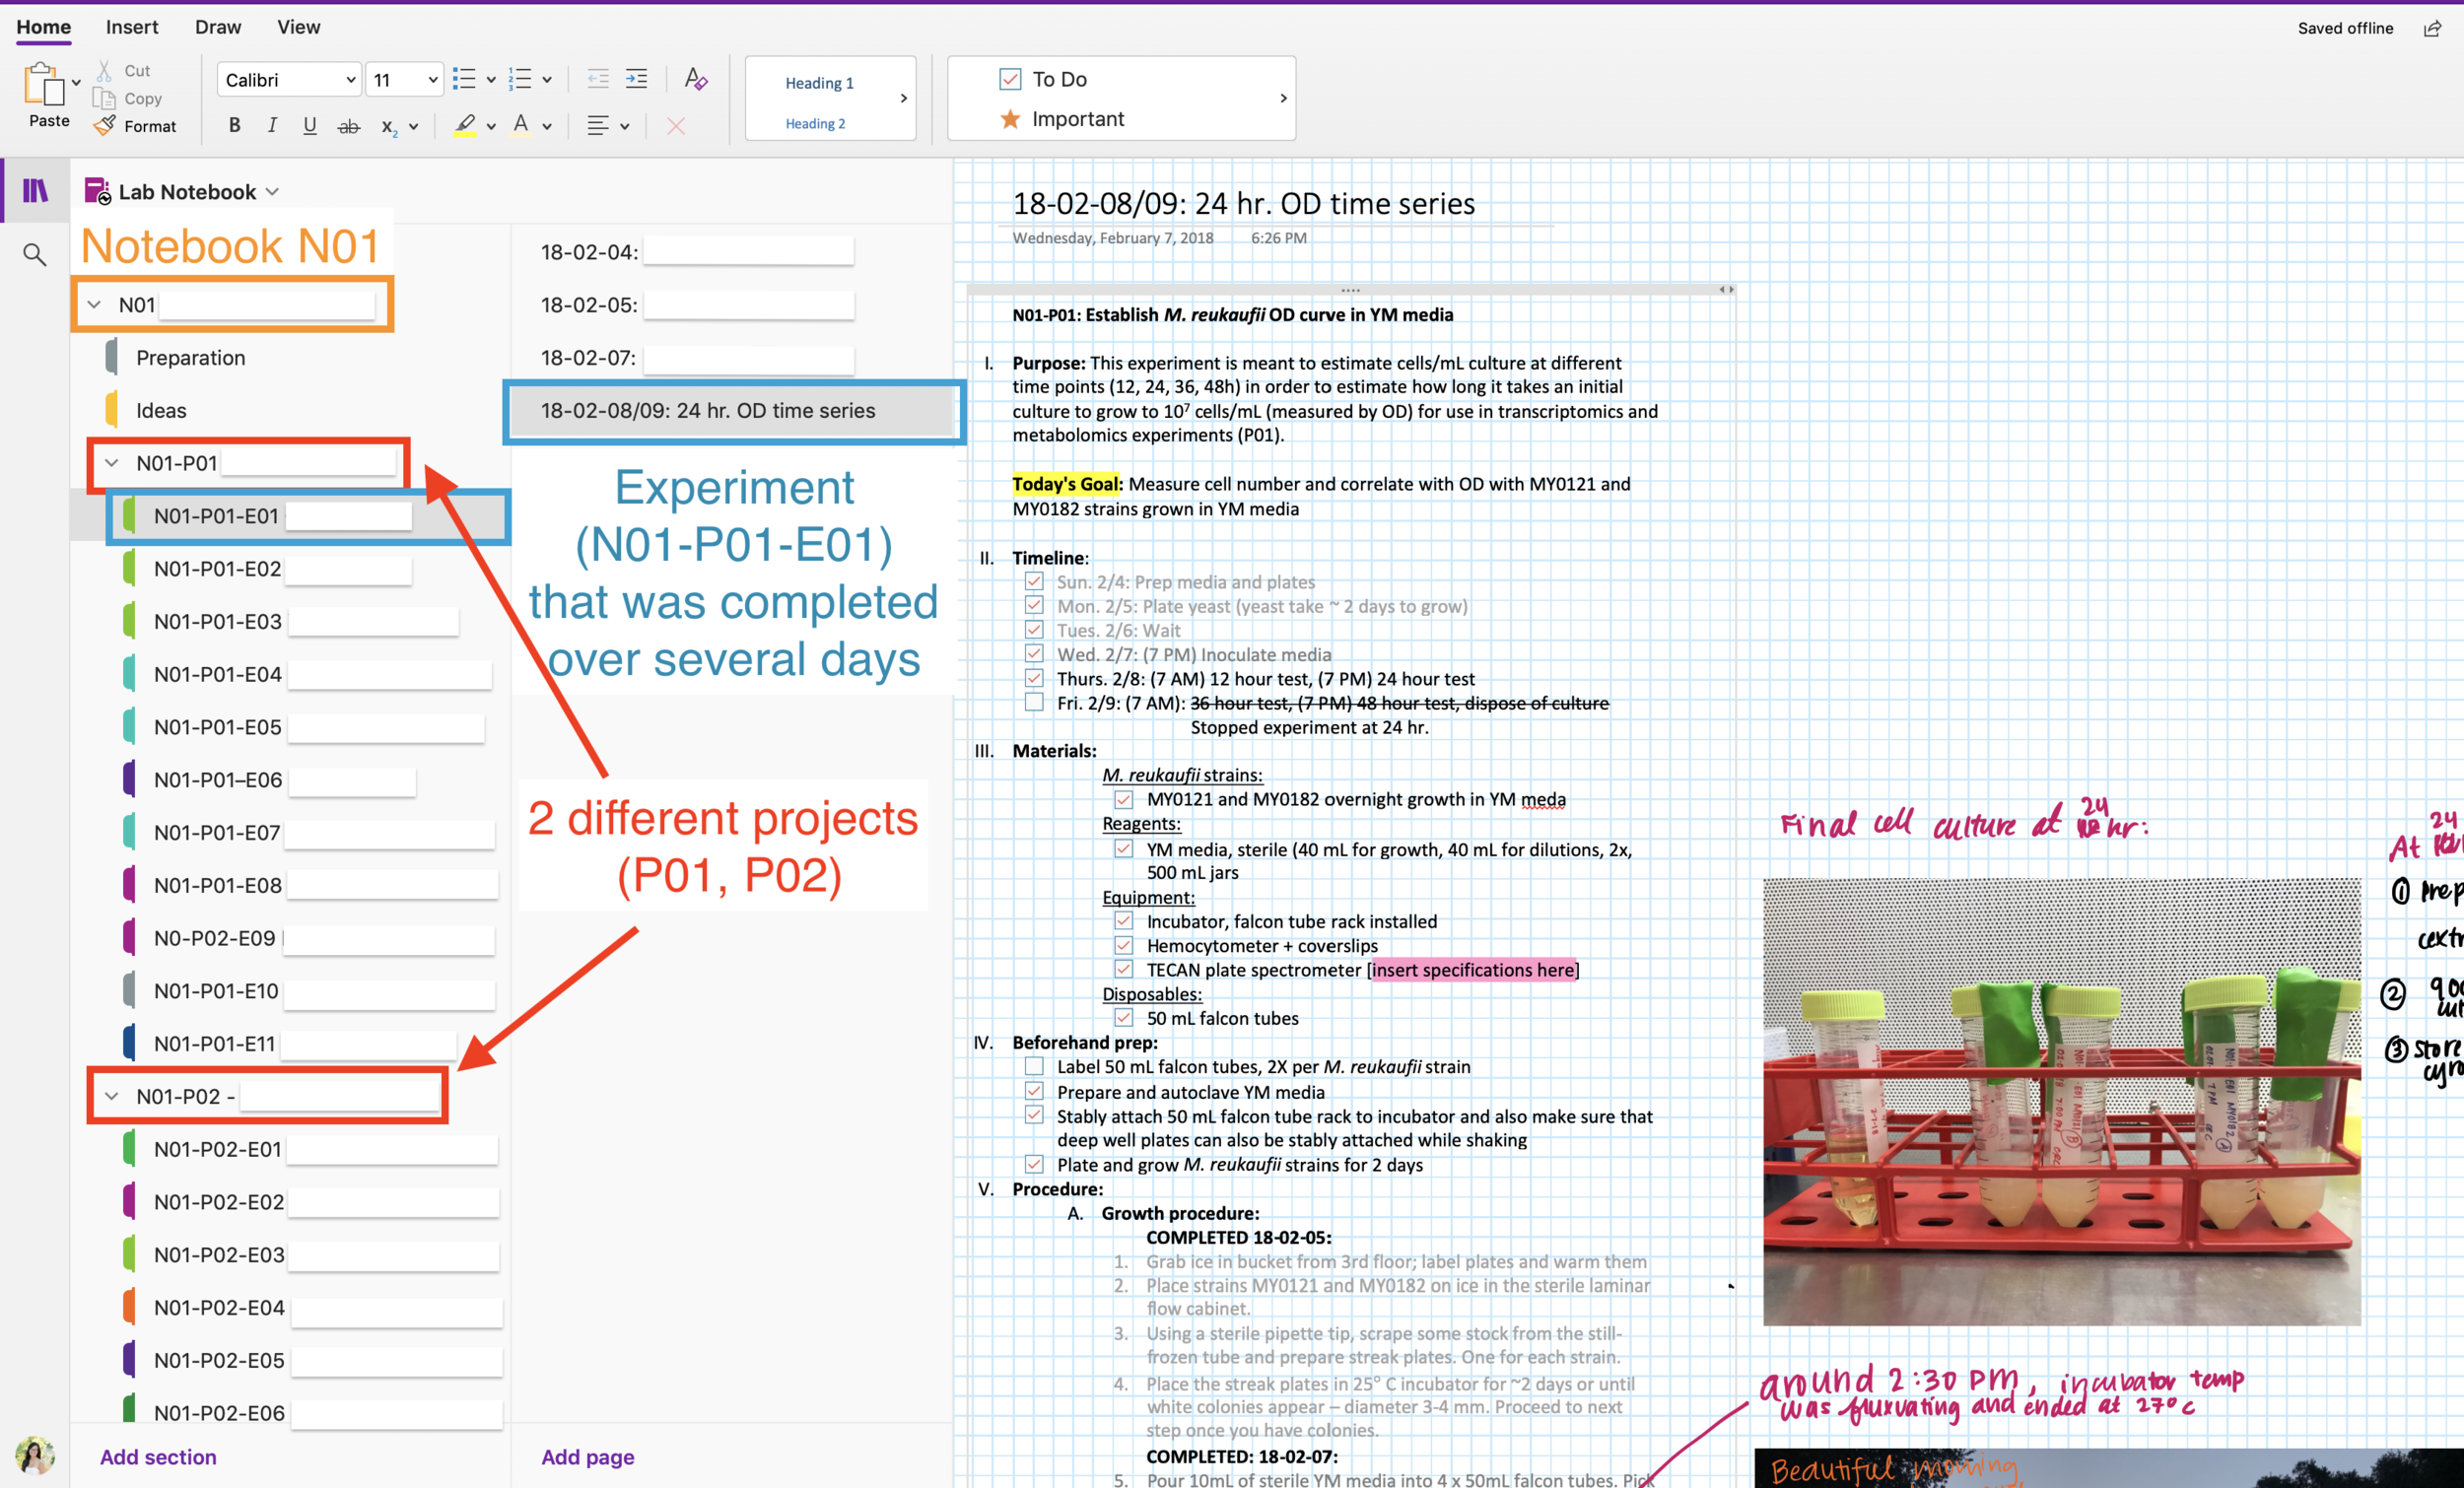
Figure 1: Organization of my lab notebook
This seems like a lot of work… why is this necessary? I’ve tried a few different organizational schemas and I’ve found that I like this the best for a few reasons:
You don’t need to have a complicated table of contents for the notebook because this is very clear and intuitive.
All of your notebook entries are easily organized and indexable because things will get ordered correctly automatically online.
If you label everything associated with a given experiment this way (data, analysis scripts, samples), you can reliably refer back to your lab notebook, regardless if you’re pulling a 5-year-old sample out of the freezer and you forgot what it is (or if a future student needs to know what it is and you can send them a copy of your lab notebook that day), or if you forgot what an R script was all about and need to refer back to when/how the data was collected .
If you look at how I organize my data and analysis files, this advantage is clear:

Figure 2: organizing files
4. Purpose: A brief description of the overall purpose of the experiment. Why were you completing it? What did you hope to accomplish with it? Include citations to journal articles or other protocols, if relevant in a references section.

Figure 3: Purpose and references in a lab notebook entry
5. Materials: List all materials you need to complete the experiment. This should include:
• Reagents (such as LB agar, sucrose, or NaCl): chemicals should have the manufacturer, CAS/product number, and ideally, lot number of the reagent you used) • Disposables (sterile inoculating loops, petri dishes, falcon tubes)
• Equipment (centrifuges, incubators, FACS machines, etc.): Also include the make and model – you need to report this in publications)
• Microbial species, strains: If you are working with any microbes, note which species, strain/isolate you are using, as well as where you got the stock from (which box in the freezer? When was it made? Who made it?)
Making a list like this is critically important, just as important as having written a clear protocol. This is for two reasons:
Before you start your experiment, you can use this as a checklist to make sure you have everything you need. Starting an experiment that you can’t finish because you don’t have the materials is wasteful of resources and most importantly, your time.
If we need to replicate the experiment, knowing details like what microscope you used and the specific brand of peptone can strongly influence the experimental outcome and is necessary to replicate the experiment. When you finish an experiment, you often feel it is once-and-done. However, months or even years after you complete an experiment, reviewers of a “finished” manuscript may ask for more experiments, which may force you to replicate an experiment.
Troubleshooting: The results of an experiment often take a long time to become apparent. If there are problems (which there often are), having a comprehensive list of what you used (especially reagents and equipment) makes it much easier to troubleshoot what went wrong.
Here is an example list of what you might include in a materials list (I often highlight missing information in green, so I can write it in my lab notebook as I complete the experiment):

Figure 4: Materials
6. Protocol (with notes!): This is where you write your step-by-step list of what you intend on doing. I always write my protocol (along with my introduction/purpose, references, and materials) ahead of time and then print out/paste into my lab notebook on the day of the experiment. As you complete the experiment, write notes and modifications to the protocol in PEN.
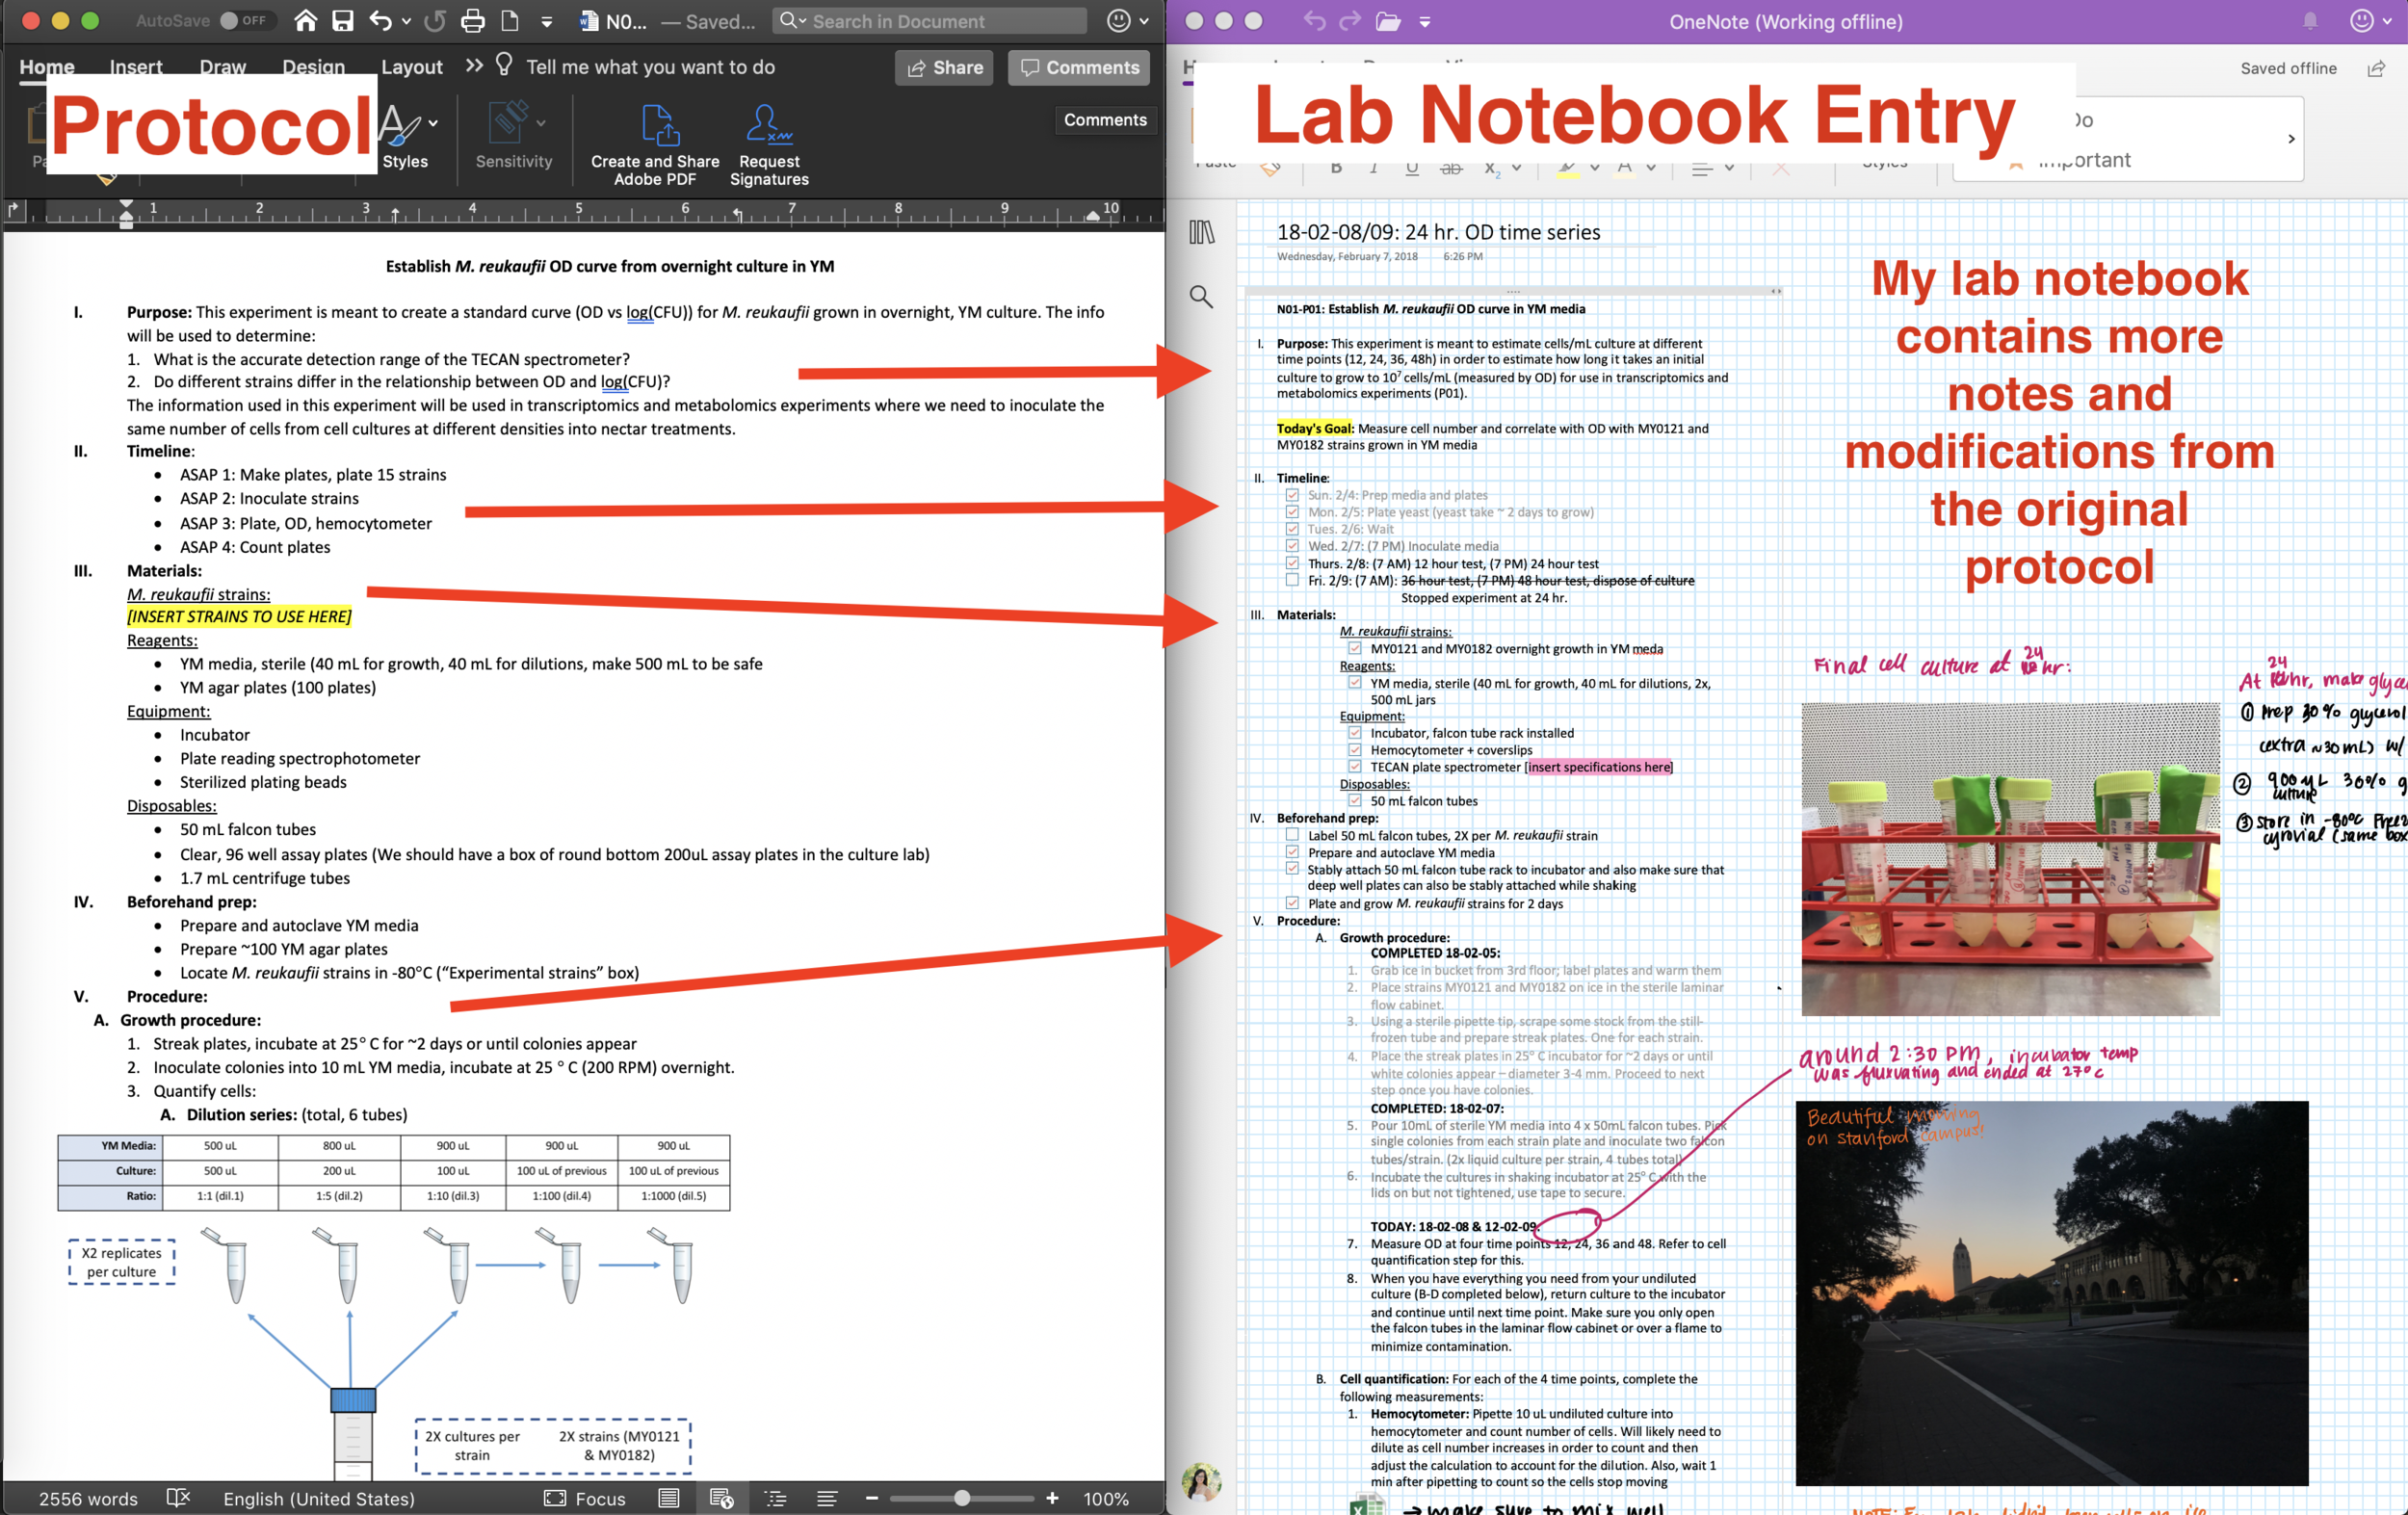
Figure 5: Protocol
7. Data: At the end of the experiment, include some notes about what the data/finished experiment looked like (such as pictures of plates, etc. if applicable) and where to find the data, ideally with a link. The data should be saved as a generalizable file format (i.e. .csv for spreadsheets) and named to be consistent with your NXX-PXX-EXX. If it can also fit in your lab notebook, that is ideal.
Check out my post on data management for more information!

Figure 6: Data
8. Results/Conclusions: At the end of an experiment, you should write down the key findings of the experiment. Any analysis should be linked here (code with plots) and a few sentences explaining the main findings.
Example of script and figures (This is a knitted RMarkdown file) (left) and conclusions (right):

Figure 7: Results

Figure 8: Conclusions
Storing the lab notebook:
Lab notebooks should always be stored in the lab (and not taken home). At the end of the day, completed lab notebook pages should be scanned/photographed and saved on the cloud.
Apps for scanning photographs into PDFs:
Scanner Pro
Genius Scan
Google Photo Scan
Electronic Lab Notebooks:
Electronic lab notebooks also have some major advantages, such as convenience. However, at this point, I think they are still inferior to paper lab notebooks + scanning without having a tablet.
References:
https://bitesizebio.com/11068/10-tips-for-organizing-your-lab-book/
http://web.mit.edu/me-ugoffice/communication/labnotebooks.pdf
https://www.ruf.rice.edu/~bioslabs/tools/notebook/notebook.html
https://www.training.nih.gov/assets/Lab_Notebook_508_%28new%29.pdf